Variables && Randomness
Overview
What we learned last class:
- What is p5.js?
- How to code essential shapes
- How to code colors
- How to code attributes
Class Overview:
- The flow of p5.js
setup()anddraw()- How to write blocks of code
mouseXandmouseYmousePressed()widthandheight- Basic math in p5.js
- How to make our own variables
- How to use incrementation operators
random()
setup() and draw()
setup() and draw() are functions that control the flow of our p5 sketches.
setup(): The starting conditions of our p5 sketch.
draw(): The continuous loop of our p5 sketch.
Setup condition of p5 sketch
Draw condition of p5 sketch (Click to restart)
Code Blocks
A code block is a section of code that is grouped together. Code blocks can appear as function and as other groupings of code such as conditional statements or classes.
Example:
This code block consists of four elements:
function- This designates our code block as a function.setup()- This is the name of our function.{ }- Open and closed curly brackets, these indicate where we will write our code.- Body - The code we will write.
NOTE: These function code blocks can be arranged in our p5 sketch in any order.
Variable Basics
In short, variables are values that change as our program runs. These values are variable, meaning they are able to change.
In this class, we'll be using two types of variables:
- p5.js variables: These are built-in variables that are part of the library.
- Custom variables: These are variables that we define ourself for use in our particular program.
mouseX and mouseY
mouseX is a variable that always stores our mouse's horizontal position.
mouseY is a variable that always stores our mouse's vertical position.
These values update as we move our mouse!
Examples:
mouseX Tracking:
function setup(){
  createCanvas(400,400);
}

function draw(){
  background(12,123,220);
  noStroke();
  fill(255,194,10);
  circle(mouseX,200,80);
}
mouseX and mouseY Tracking:
function setup(){
  createCanvas(400,400);
}

function draw(){
  background(12,123,220);
  noStroke();
  fill(255,194,10);
  circle(mouseX,mouseY,80);
}
mouseX size:
function setup(){
  createCanvas(400,400);
}

function draw(){
  background(12,123,220);
  noStroke();
  fill(255,194,10);
  circle(200,200,mouseX);
}
Drawing Program with mouseX and mouseY :
function setup(){
    createCanvas(400,400);
    background(12,123,220);
}

function draw(){
    noStroke();
    fill(255,194,10);
    circle(mouseX,mouseY,10);
}
mousePressed()
mousePressed() is a special function within p5 that is called every time we click our mouse.
To use mousePressed() we need to make a new function block of code.
Examples:
mousePressed() Drawing Program:
This program resets our drawing every time we click the mouse by redrawing our background().
function setup(){
    createCanvas(400,400);
    background(12,123,220);
}

function draw(){
    noStroke();
    fill(255,194,10);
    circle(mouseX,mouseY,10);
}

function mousePressed(){
    background(12,123,220);
}
width and height
width and height are built-in p5 variables that store the width and height of your canvas.
Example:
function setup(){
    createCanvas(400,400);
}

function draw(){
    background(12,123,220);
    noStroke();
    fill(255,194,10);
    circle(width/2,height/2,80);
}
Arithmetic Operators
We can alter the values of numbers and variables by using arithmetic operators.
+- Addition-- Subtraction*- Multiplication/- Division=- Equals
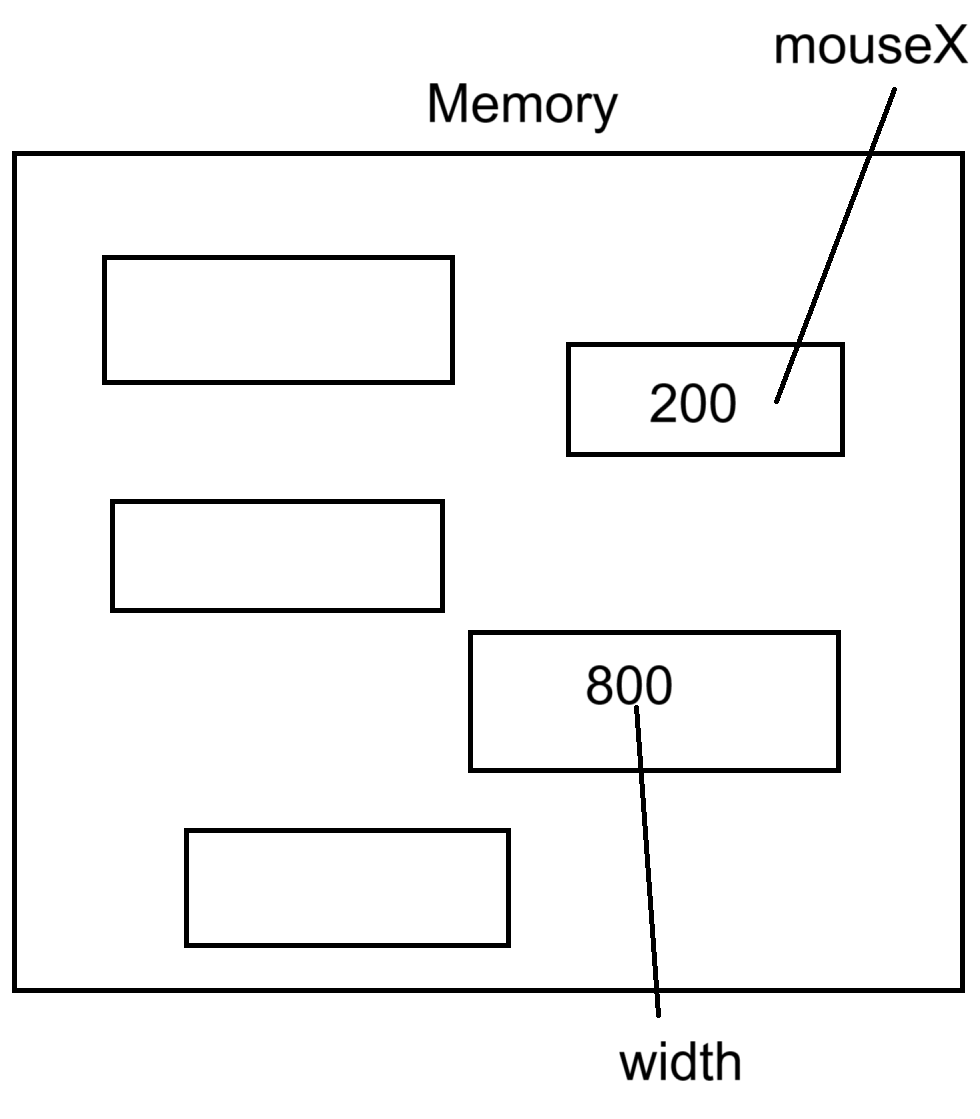
What is a Variable?
What is mouseX or width?
Variables are named storage locations in our computer's memory where we can store values.
mouseX and width are both named storage location where p5 is constantly updating their associated values.
Making our Own Variables
Steps to Making a Variable
- Stating
let - Name of variable
- Initialize variable
- Use the variable
let
We can use the keyword let to begin declaring a variable.
Example:
In JavaScript, we don't need to tell our editor what type of variable we are making. In other words, we don't need to let JavaScript know if our variable is a Number, a word, or something else. In part, it is up to the artist to keep track of what type of variable we want each new variable to be.
Some variable types:
JavaScript variables:
- Number: both decimal and whole numbers
- String: words or sentences
- ...and many more
Name
We can name our variable anything, but it is good to use a name that allows us to keep track of what we want it to do. As an example, circleX to control the x position of our circle.
Some rules to follow:
- Lower case letter to start
Dogvs.dog - No numbers as first character
1dogvs.dog1 - No spaces
black catvs.blackCat - use camelCase
blackcatvs.blackCat - Don’t use reserved keywords or existing p5 variable names.
Initialize
To initialize our variable, we need to provide with an initial value using the = operator.
We can do this in setup() :
Use
After we declared and initialized our variable, we can use it in our sketch. Here cricleX replaces the x value of our circle.
Note: although we are using are variable, we are not changing it's values, so our sketch remains static.
let circleX = 0;

function setup(){
    createCanvas(400,400);
}
function draw(){
background(12,123,220);
noStroke();
fill(255,194,10);
circle(circleX,200,80);
}
Variable Scope
Variables have two levels of scope, global and local.
We won't go into too much detail about this now, but in short:
-
Global variables are declared at the top of our sketch. They can be used within any block of code.
-
Local variables are declared within a block of code and can only be used within that code block.
Incrementation Operators
We can use incrementation operators to change the value of our variable over time. If I want to increase the value of circleX by 1 every time draw() is called, we can use the code:
- Change the value of a variable (
circleX+1) - Assign that value back to the variable (
circleX = circleX+1)
Short hands for incrementation operators:
Addition:
Subtraction:
Multiplication:Division:
Example:
Moving a circle using addition incrementation operator on circleX :
let circleX = 0;

function setup(){
  createCanvas(400, 400);

}

function draw(){
  background(12, 123, 220);
  noStroke();
  fill(255, 194, 10);
  circle(circleX, 200, 80);
  circleX += 1;
}
Note: This example is repeating. Some extra code was added to make this example for the website. We'll learn more about this next class.
We can change how fast the circle is moving by the changing incrementation value.
Note: This example is repeating. Some extra code was added to make this example for the website. We'll learn more about this next class.
random()
Syntax:
random(max)- returns a random value between 0 and max
random(min,max)- returns a random value between min and max
Parameters
- min - (Number) lower limit
- max - (Number) upper limit
random() returns a number value. We can assign this value to variables or use the value as parameters in functions.
Examples:
Random position on mouse click using random() :
let circleX = 0;

function setup(){
  createCanvas(400, 400);

}

function draw(){
  background(12, 123, 220);
  noStroke();
  fill(255, 194, 10);
  circle(circleX, 200, 80);
  circleX += 1;
}

function mousePressed()
{
  circleX = random(0,width);
}
Collection of Dots using random() :
let x;
let y;
let a;
let r;
let g;
let b;

function setup(){
  createCanvas(400, 400);
  background(12, 123, 220);
}

function draw(){

  noStroke();

  y = random(height);
  x = random(width);
  a = random(60,200);
  r = random(200,255);
  g = random(200,255);
  b = random(100);

  fill(r, g, b,a);
  circle(x, y,10);

}

mousePressed(){
  background(12, 123, 220);
}
Click to reset